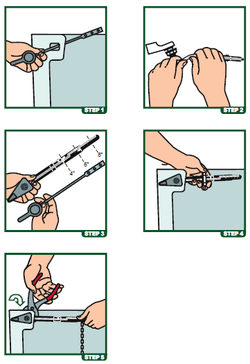
1. Remove tank lid. Disconnect the flapper chain/linkage from the lever. Unthread nut from old lever. Remove lever from tank.
2. For standard front-mount tanks go to step 3. For A SIDE OR ANGLE-MOUNT TANK, slowly bend new lever arm to match
the shape of the old lever arm. DO NOT BEND ARM QUICKLY OR BACK AND FORTH REPEATEDLY.
3. Measure length of existing lever arm. If necessary, trim new arm at the cut line that best matches the length of the old arm (hacksaw recommended for best results).
4. Slide arm through tank hole until handle shank fits snugly. Slip lock nut over lever (flat side facing handle). Start nut on threads (reverse thread). DO NOT TIGHTEN FULLY.
5. Connect flapper chain/linkage to arm hole that provides the best lift. Chain should have slight slack when flapper is in the closed position. Check lift action for proper flush. Tighten lock nut. DO NOT OVERTIGHTEN. Overtightening may crack tank.
Fluidmaster Pro is plumbing supply built for professional plumbers.